literature

Shading Hair: Single Strand (Short Hair)

Deviation Actions

J-Cody's avatar
By
Published:
1.4K Views

Literature Text

Hello! I'm Jessica and I have an obsession with drawing especially hair. I feel like I should announce that like I'm in a support group. I am a traditional artist who prefers pencils to a paintbrush, but some of the principles (i.e. light sources) below can be applied across almost all mediums. This is not the only way to draw hair. It is just what works for me at the moment.

First things first! What am I working with?


Graphite pencils made by Faber Castell are my favorites. I do have other brands of pencils like Prismacolor, but what you really need is a wide range of lead grades. I currently use 6H-9B on a regular basis with 4H and 2B-6B being used most. With my 4H, I sketch rough drafts and shade the first layer of skin. My 2B-6B are used mostly for shading. The objective is to get a good range of values out of them. Without contrast, a drawing can look flat and unrealistic.

GraphiteScale

Paper is equally important. There are many types, different brands, weights, etc. that all factor into how your finished product turns out. There are times where I'll use regular drawing paper because I want the texture of the paper to show through or I'll use Bristol when I want smooth shading. For portraits, I use Strathmore Bristol Smooth.

Erasers for highlights and texture are essential in my drawings. I have three types that I use. A Faber Castell dust free (big block eraser) for large areas, Faber Castell pencil eraser (a pencil that is filled with an eraser instead of graphite) that I use for smaller details, and a kneaded eraser for the smallest of details or whenever I need to pick up a very dark shade. I've been saying for months that I wish to try out a tombow zero eraser to add to my collection, but I haven't just yet. It is planned, so maybe my next tutorial will include it.

For blending, I use a combination of a blending stump (tortillion), paper towel, chamois, and my finger. Most of my blending is with a tortillion and paper towel.

Tools by J-Cody


The Drawing


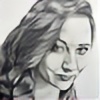
When I usually draw hair, I go for what I consider the ribbon technique where individual strands are clumped together. Unfortunately, there are times when that doesn't work for me so I had to experiment with a combination of ribbon and individual hair drawing. I have already worked on this so we'll start with the unfinished section for examples.

Hair 1 by J-Cody    Hair 2 by J-Cody

In the first picture above, I had sketched the outline of the hair with my 4H then went over it with a 2B adding in lines going in the same direction as the reference. After I got a good outline, I added more wisps of hair in the same direction and blended with a tortillion. There are a few ways you can blend. Some people do tiny circles, others hatch as they would with their pencils. For hair, I do all of it. I'm really a whatever works kind of person. I usually hatch it roughly then do circles to get a nice smooth gradient of graphite. In the second picture above, you can see where I started to hatch.


  Hair 4 by J-Cody     hair 3 by J-Cody 

Now lets get a little darker. In the first picture above, I applied 4B strokes in the same direction as I did the 2B pencil then used a tortillion to blend. This is the step where I finally start using my erasers. Since the areas that need to be lightened aren't large, I used my pencil eraser to remove areas that will be most affected by the light source. Since the head is curved, the hair is also curved and will need darker strokes where the sun doesn't shine. :)  Since the erasers pick up graphite, the graphite will stick onto the erasers. I keep a spare sheet of paper under my drawing hand not only to block my hand from smudging the graphite as I work but to also rub the graphite off from the pencil eraser. For the kneaded eraser, you just have stretch and knead the eraser to get a clean bit ready to erase again.


 hair 5 by J-Cody  Hair 6 by J-Cody

I repeated the same step with a 6B then I broke out my kneaded eraser.

 Hair 7 by J-Cody   Hair 7.2 by J-Cody

I reworked the section until I was fairly happy with it. This is why I use heavier paper. It allows me to work more, because right now I don't know how to work less and get the same or better results. And I'm fairly happy with the result in the second picture above, but as I worked through the rest of the hair, I did go back over it a few times and added in some finer detail.

 Hair 8 by J-Cody   To be named WIP by J-Cody

With the child in the picture, I used the ribbon technique where I partitioned the hair in clumps. He has a bit more curl due to the length of hair so that method worked well for me. The man's hair was much shorter and uniformed hence the change. Below is a link for the ribbon style technique of shading hair. It hasn't been updated since May, but it is still relevant in basics. It is more focused on how to shade in shapes and how light sources (and secondary light sources) affect your drawing.


Time lapse for the second part of hair


There are also more time lapses for this project and others under my channel. Some of them in charcoal. :)

No sound. You are welcome. :)


~~~~~~~~~~~~~~~~~~~~~~~~~~~~~~~~

Finished


A Father To A Son by J-Cody

~~~~~~~~~~~~~~~~~~~~~~~~~~~~~~~~

Feedback requested


If there is something you have questions about, please don't hesitate to ask. Also, if there is a different feature you'd like a tutorial on, please comment below with that suggestion. I'll try to incorporate desired tutorials as I work through my projects.

If there is any confusion or lack of information, please let me know and I'll amend this tutorial.

~~~~~~~~~~~~~~~~~~~~~~~~~~~~~~~~

A short tutorial on how I shaded short hair in graphite. This is not the only way to shade hair. I even use other techniques in other portraits. This just worked well for me in this portrait.     
© 2016 - 2024 J-Cody
Comments2
Join the community to add your comment. Already a deviant? Log In
Whobleyh's avatar
Very clear and helpful :)
Thanks!